Friday, January 5, 2018

Christmas ornament

So, I do realize that Christmas is already over, I just haven't gotten aroynd to posting this yet. I have no excuses for not blogging so much, other than Instagram (by_moe) taking over my life :p


Anyway: what you need is a styrofoam ball, felt and pins.


Cut circles about 8cm in diameter, then cut those into spirals.


Roll the spirals up to a rose, starting from the outer end in to the middle, and then stick the middle end under the rose. Put a pin through the middle of the entire rose and pin it to the ball. And repeat until the ball is fully covered.


A tip for the string: tie it first around the ball before you pin the whole thing, this will ensure that the string wont fall off. I've used a hemp string (love those), but you can use just about anything you want.


Sunday, July 31, 2016

Pompom rug

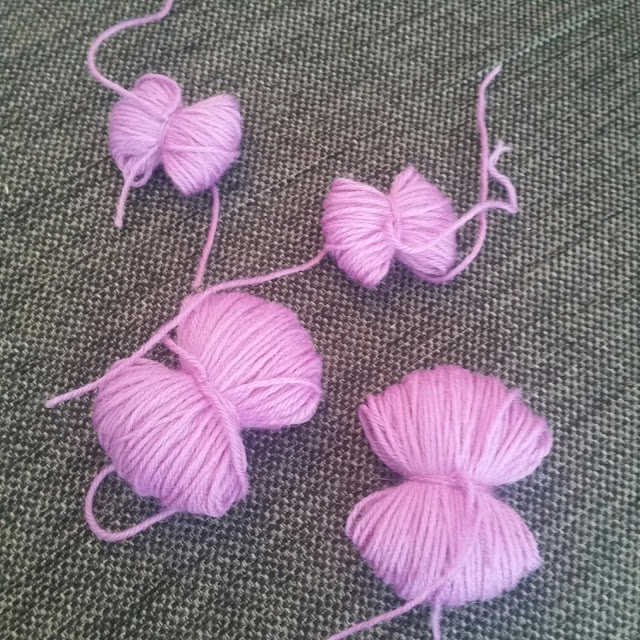
Today I decided to make a small rug out of yarn pompoms. The lesson I learned from today's exploring is that you need a lot more pompoms than you think you need!

I started cutting out circles from cardboard the way I learned in school when I was a kid, but that was 20 years ago and people can be very creative in 20 years; while I was threading the first pair I started thinking about my friend Nora that made miniature pompoms on a fork.
Then I remembered that I have a device for making hairpin lace(check out my earlier post about hairpin lace on this blog), which in Norwegian is called a fork.

I'm so glad i remembered this before I got too far, because in no time I had made a pile of pompoms- it was super quick!

Thanks to the hairpin lace-fork being adjustable I could make pompoms in various sizes.

I recommend a small pointy scissor for cutting. When you've cut them you need to fluff them up and trim them to the right shape. NB! Be sure to leave the threads you used to tie the pompom with long, you will need them later!

I got this anti slip thing for carpets at IKEA for basically no money at all. Cut to desired shape and size, and start sewing the pompoms on the anti slip thingy, using the long threds from when you tied the pompom!

This one was done in a total of 4 hours, from the first pompom on the fork to finished rug. Next time, I'll make more pompoms to make a bigger rug ;)

Thursday, June 23, 2016

Shame on me

Hm, ever since I got Instagram I've forgotten a little bit about this blog. I will make a mends, I promise!

In the meanwhile, please check out mentioned Insta-profile: by_moe, or enjoy the samples below :)


Oh, I also got married! :D


Wedding pictures taken by Fredrik Riddarsporre

Wednesday, December 23, 2015

First attempt at yarn bowl

First, I'd like to inform that I finally got an Instagram account, I would be very happy if you would follow me there! My username is by_moe, and it will feature my finished products etc.

Ok, so a friend of mine tagged me in a post about yarn bowls on facebook the other day. I decided I would try to make one myself. The next day I went to the crafts store Panduro to buy some clay:
About half a package is enough for one bowl.

Start by rolling out the clay like you would a pizza dough, just not as thin. Then, cheat a bit by placing it over a plastic or glass bowl, to help you with the shape. I tried freebasing one first, looked like something a five year old with free reins made... Try to make it as smooth and even as possible, and cut off excess clay to make the rim:

Cut out the swirly part(or which ever shape you'd like), but make sure it won't be too small/thin when it dries or it might be fragile and snap:

Get some water on your fingers to smooth out the surface as much as you can, this will save you some work later on:

Roll out a thin piece of clay and place it on the bottom of the bowl(press it on to the bowl so it sticks, of course), this is to prevent it from being wobbly. Like the wannabe artist I am, I added my initials and the year at the bottom :)

Now here comes the dreary part: drying time is two days! Since I was not familiar with this clay I didn't want to put it in or close to an oven, fearing it would crack or something.

When it is dry, pry it carefully off of the "cheat bowl". It will have an uneven finish and have marks after some pesky air bubbles(I have to find a way to avoid those), and have rough edges. Solution: very fine sand paper. Go over the entire bowl, inside and out with the sandpaper, to make it more even and smooth. Cut a small, thin piece to work the swirl better. Careful, careful.

All the dust that comes from the sandpaper treatment I used to make a paste to fill in dents and crevices, all I did was to add some water! Thankfully, the drying of this only took two hours or so. Then I went over the fillings with sandpaper too.

FINALLY, it was time to paint it! After the paint, I added a coat of varnish to make the colors more durable.

Ta-daa!


It is far from perfect, but I think it'll serve its purpose. At this time, it is gift wrapped, ready to be given to my mother for Christmas. It's like I'm ten years old again, giving away self made pottery as presents! ;D

MERRY CHRISTMAS!


Saturday, August 29, 2015

Jake, the crocheted dog


Today I decided to make an Adventure Time key ring for my fiance. It is disproportionate and poorly made, as I lost patience with the little sucker towards the end, but it's made with heaps of love :P
I will definitely make another one at some point, and adjust the work a little. And breathe more steadily ;)

First, I made four chain stitches, which I then connected into a loop:


Then I made 8 single stitches in the loop. After that I increased continuously a few rounds, making two single stitches in every other stitch in the previous round, until I felt like the bottom/top of Jake's body was big enough. To make a sylinder shape, I just made one stitch in every stitch, until the body was long enough.
Bottom is big enough now.

One single stitch in every previous stitch to make it go upwards. This is with the inside out, which automatically happens when doing this technique. 

 Flipped right side out.


The body is long enough.


Stuff the cylinder with wadding, before closing it up. To close, do the opposite as in the beginning: skip making stitches in every other previous stitch.


Now this is what killed it for me- finding out how to do all the small parts. As I improvise everything, experimenting can take a lot of time. But, I ended up with limbs and whatnot anyway:

Sewing them on(and eyes, mouth and ears) late in the evening when you should have eaten something a long time ago is nothing I would recommend. This is where my patience with Jake, and the universe in general, flew out the window. But, I got through that too, stubborn as I am. Last thing to to was to attach the key ring itself through Jake's head, and I could finally present it to a very happy guy :)

Now, late night snack!

The end.

Wednesday, August 12, 2015

Holiday crafts

This summer my fiance and I went to Greece, going to different islands. I didn't bring any crafts with me other than pencils and sketching paper. Problem was, I haven't been in drawing mode for years, so I was constantly looking for a crafts shop. There were a lot of shops with crafts in them, but not much supplies. Until we got to Naxos, there I found a shop called Beads, which had a very small selection of beads and cords etc, but it was super expensive and choices were limited. But, it was enough to soothe my crafts itch for a while. Then, a few days later, we walked past a yarn shop! So of course I bought some yarn! I tried explaining to the Greek lady that spoke no English, what a tatting needle was, but I gave up and just got a regular crochet needle.
At Beads I found relatively good cords, but the beads I will probably donate to a kindergarten(I bought a bulk bag for 3 euros, which was the best deal I could find there).

 Some typical holiday bracelets, top one has a turquoise on it.

A few days after that, in a random supermarket one night, I found a package of needles, where one was long and thin enough to use as a tatting needle. Also found safety pins, so that bracelet making would be easier.

The yarn I bought. These would cost me 6 euros a piece here in Norway, there i got them for 2,5 euros.


The project I ended up spending most time on is this. It will be a back piece for a top. Hope it works out the way I want it to, as I am, like with everything, winging it :P

Sunday, July 26, 2015

Opportunity is missed by most people because it is dressed in overalls and looks like work

Thomas Edison's words, which I believe to be true.

The museum shop that took my products in for sale told me that since my items were sold, they wanted more. Of course, I was over joyed! :D
The manager is on holiday right now, but I've decided to finally start making the loooong overdue product catalog.
I've been thinking about making such a catalog forever, but since that meant a lot of work, I have been putting it off forever. But, now that the opportunity is so much more in reach, which makes it so much easier and motivating!

And a lot of work it is: setting up for a photo shoot (yay, photography, my favorite thing! not), taking pictures of everything(man, I've been productive! so many things..), editing the pictures(enhancing the lighting and cropping away unnecessary space etc), putting them into a catalog template and writing product info and prices. Tho, couldn't find a fitting template, so my man helped me make one :)
I am going on a holiday myself tomorrow, so I won't get it finished before I go, but I am very close! :D

Number of final photos, ready to be put in to the template: 244, one pic for each product. And that's without all the things I've made that are totally crap, suited for the bargain box.


A small selection for you: